Simple Summer Skewer Marinade Recipe (Grilling 101)

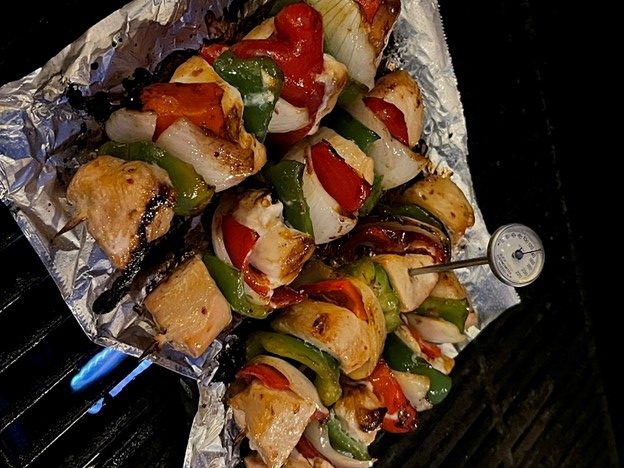
BBQ season is upon us, and whether you prefer gas or a charcoal grill, the end result is a smoky, char-broiled masterpiece. There are many ways you can kick off BBQ season—you can stick with the traditional burgers and dogs, you can grab a nice rib-eye, or you can opt for chicken or fish. One of my favorite “go-tos” is creating a shish kabob. The reason I love this is it’s kind of like a one-pot wonder, on a stick. You can layer your favorite meats and veggies and even toss on a potato or other healthy carb if you are feeling froggy.
The first key to grilling is knowing what temperature your meat should reach to be considered safe by the FDA. The following are their recommendations:
- Steaks, chops, roasts (beef, pork, veal, and lamb): 145 degrees F (62.8 degrees C) plus time to rest for at least 3 minutes
- Ground meats: 160 degrees F (71.1 degrees C)
- Ground poultry: 165 degrees F
- Fresh or smoked ham (uncooked): 145 degrees F (62.8 degrees C) plus time to rest for 3+ minutes
- All poultry (breasts, whole bird, legs, thighs, wings, ground poultry): 165 degrees F (73.9 degrees C)
- Fish or shellfish: 145 degrees F (62.8 degrees C)
I don’t know about you, but I always get confused when selecting a cut of beef. I don’t always remember the terms for various meats, but I sure can tell by the texture or way it tastes its quality. I don’t like being fooled into thinking that the higher the price, the better quality, and I am always looking for the best bang for my buck.
How to Pick the Right Cut of Meat
If you are grilling with red meat, the following is a handy guide provided by the USDA:
There are two ways beef is graded: quality for tenderness, juiciness, and flavor; and yield for the amount of usable lean meat.
What do these quality beef grades mean for consumers?
Prime beef is made from young, well-fed cattle. It has abundant marbling or fat throughout the lean meat. It’s typically found in restaurants and hotels rather than in grocery stores. Prime meats are fantastic for cooking with dry heat, including being grilled, broiled, or roasted.
Choice beef is still a high-quality cut, but it has less marbling. Choice cuts from the loin and rib are tender, juicy, and flavorful and are also suited for dry-heat cooking. Less tender cuts can often also be dry-heat cooked as long as they’re not overcooked. Such cuts will be most tender if braised, roasted, or simmered with a small amount of liquid in a tightly covered pan.
Select beef is typically leaner with less marbling than the higher grades, but it’s still fairly tender. It tends to be less juicy as well. Tender cuts can be cooked with dry heat, but other cuts will be more enjoyable when marinated before cooking, or braised so they become more tender and flavorful.
There’s no need to worry about standard and commercial grades of beef as they’re usually sold ungraded or as store brands.
How to Grill Skewers
Now that we know how to select the right cut of meat and the proper cooking temperatures for various ingredients, it may be helpful to learn how to properly prepare your grill. The folks over at Weber have put together their list of the most important grilling tips, which include:
1. Preheating: With the lid closed, preheat the grill for 10 to 15 minutes on high until the temperature reaches 500 degrees F. This heat will allow any bits of food hanging onto the grate to soften and release, so they’re easy to brush off. If there are pieces of food stuck to the grate, when the grate is hot, it can be cleaned with a stainless-steel brush. (Make sure you replace the brush if there are any loose bristles falling onto the cooking grates.)
This step gets the grate hot enough to sear properly and helps prevent anything from sticking to the grate.
2. Keeping the Lid Down: Keeping the lid down as much as possible keeps the grates hot enough, so they can sear the food. It also speeds cooking time, so the food isn’t as likely to dry out while keeping the smoky flavor seared into the meat. Finally, this step prevents grill flareups, which can burn the food.
3. Monitoring Time and Temp: You don’t want to over or undercook the food, so remember to set a timer. Remember, if grilling when it’s cold or at a higher altitude, it takes longer to cook the meat. Also, if it’s a breezy day, it can lower the temperature on gas grills but will raise the temp on ones that use charcoal. Adjust the timing as needed.
4. Choose Direct Heat (when the fire is directly below the food) for smaller, more tender pieces of food, especially those that take 20 minutes or less to cook.
5. Or Choose Indirect Heat (when the fire is on either side of the food) for larger or tougher cuts of meat that need to cook for 20 or more minutes.
6. Keeping Grill Temperatures Consistent: Dampers on the top and bottom of a grill manage airflow. To increase the heat, allow more air flowing. To slow fuel burning, close the top vent up to halfway. Leave the bottom vent open when grilling to keep the fire burning.
Under normal conditions, charcoal briquette fires lose around 100 degrees F of heat over 40 to 60 minutes. Lump charcoal fires typically drop heat even faster.
With gas grills, you can easily maintain the heat and create different grilling zones by using the temperature knobs to adjust the heat up or down in minutes.
8. Searing in Flavor: One reason grilled food is so popular is because the meat caramelizes and the flavor is seared into the meat. To optimize this flavor, use the correct heat for your choice of food and resist the urge to turn it too much. (As a general rule, you’ll want to flip it only once.) Having patience while grilling allows the food to brown and caramelize, creating the richest flavors and aromas.
BREAKING: Forget Taking Collagen, Try This 21-Second Trick for Healthier Skin & Hair Instead
9. Avoiding Lighter Fluid: Sure, it helps to start the fire, but when the liquid fuel evaporates, the chemicals are absorbed into the food, negatively affecting the flavor and aroma. Who wants that? To start a fire more quickly and more efficiently when using briquettes, try chimney starters and/or lighter cubes.
Finally, the recipe!
For my first summer recipe, I opted for chicken. I have used it on pork, as well, but it is so versatile that you could use it on just about anything, even just veggies if you are opting for a meat-free night. The reason this is one of my “go-to” marinades is because it uses ingredients I generally have on hand. I like to use fresh herbs and have rosemary, thyme, basil, and mint in my backyard, so these have become staples in my summer recipes.

Ingredients
- ¼ cup balsamic vinegar
- ¼ cup extra virgin olive oil
- ¼ cup honey
- 1 tsp thyme or rosemary
- salt and pepper to taste
Instructions
- Preheat your grill (instructions noted above).
- Combine all marinade ingredients; set aside.
- Select your meats and/or veggies—prep accordingly.
- Prepare skewers layering meats and/or veggies.
- Add marinade to the meats and/or veggies.
- Grill until cooked (temperature recommendations noted above).
- Enjoy!


 7 Signs Your Body is Seriously Low on Collagen (not just wrinkles)
 Health Expert: "Turmeric Doesn't Work (unless...)"
 3 Warning Signs Your Probiotic Supplement is a Total Waste

