How to Grow an Indoor Garden (for any sized home)

Depending on your location and the time of year, you may be looking outside to snow on the ground, a lush, green lawn, a concrete jungle, rock garden, an untamed (and perhaps overwhelming) landscape, or a combination of the above. Yet the desire to see if you can provide at least a little bit of your own food is enticing…
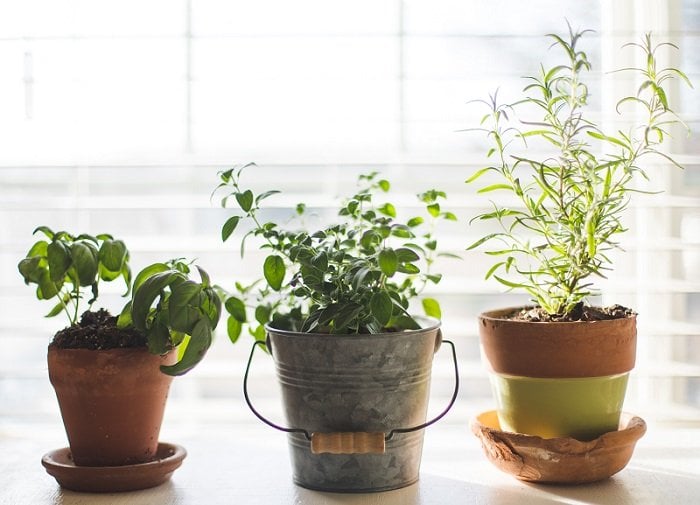
No matter where you live — from coast to coast and everywhere in between — or the size of your abode — whether it’s a large, sprawling family home or a single-room apartment — if you have the inclination and a sunny window, you can grow an indoor garden. And it doesn’t have to take much time or effort to enjoy the fruits (or, more likely, veggies) of your labor. You can use as much or as little space as you’d like — from a small windowsill to a full room.
Let’s get started on how to grow an indoor garden!
Where to Grow an Indoor Garden
Unless you’re willing to invest in grow lights, the first thing to look for is a window. Beyond that, you’ll want to look at your window options carefully. A south-facing window is ideal because it gets the most sunlight throughout the day, which is best for most vegetables. But a sunny western-facing window will also work well.
However, if you don’t have one of those options (or you just want to grow more vegetables than one side of your home allows), you can also choose an eastern-facing window and its gentle morning sunlight to grow cool weather plants like lettuce, spinach, and radishes.
If your only option is a northern-facing window, you’ll likely need to invest in at least some grow lights, as these windows get the least amount of natural light and may not be able to provide enough light even for cool weather plants.
As a rule of thumb, vegetables need at least four to six hours of sunlight. Fruits (including tomatoes) need even more at eight to ten hours. During the winter months, this often isn’t possible, and grow lights will be needed. If your plants aren’t getting enough direct light, they’ll typically let you know by their small leaves, thin stems, and lighter color.
As your plants are germinating, however, warmth is even more important than light. So, make sure your seeds are getting a lot of warmth from the sun without too much of a draft. Most plants like a relatively steady temperature of between 65F° and 75F°. If it’s warmer, look for plants that prefer a warmer environment.
If you live in a colder climate and it hasn’t yet warmed up, you may need to move your plants away from the window if it gets too cold at night. But if you live in a warmer climate — or it’s the middle of summer — you also don’t want to get your plants too warm. So, you may need to have your plants on something that’s easy to move, like a rolling cart, or go with fewer plants that are easy to move.
What Do You Need to Grow an Indoor Garden?
If you guessed pots, soil, and seeds, you’re right! However, you want to start with indoor potting soil rather than just grabbing some dirt from outdoors. That is, unless you’re willing to go through the hard work of sterilizing your soil, as outdoor dirt tends to come with insect eggs, weed seeds, and other unsavory elements.
To help your plants get the nourishment they’ll need, you’ll also want to pick up some vegetable fertilizer. There are numerous choices, so you’ll want to read the recommendations and choose one designed for what you’re planning on growing. You can choose pellets, organic liquids, worm castings, etc.
For your “pots,” you can use traditional pots, recycle containers you already have, or even use the clear plastic cups that come with your iced coffee or tea, some gallon jugs, or old (clean) juice or milk jugs with the tops cut off.
For larger plants, you can use buckets or reusable fabric grow bags. A good rule of thumb is to use a 2-gallon pot/bucket/bag for each 12 inches of plant height. So, if you’re growing a larger plant, like tomatoes, you’ll want to go with 4 gallons for a 2-foot tall plant or 6 gallons for a 3-foot tall plant (once fully grown). To know what sizes to get, you’ll need to decide what you want to grow first.
Whichever “pot” you choose, you’ll want to ensure it has drainage holes (or provides air flow as the fabric bags do). If the roots are left to sit in excess water, they start to rot. And if you’re reusing any containers — including those you may have left over from buying plants last year — make sure they’re very clean. Otherwise, they could harbor bacteria or disease that can harm your plants.
You’ll also want to protect your windowsill, floor, or table by setting down a protective tray or another container for any drips, dirt, or debris. You may also want to put some stones in the bottom of your container for better water drainage. It’s best to grow in a room that has a floor that’s easy to clean (such as tile or linoleum) or to lay down a tarp for any inevitable drops of water or spills.
Mulch is also helpful for both indoor and outdoor gardens as it helps soils retain moisture and keeps the temperature more even. Common options include straw, a shredded leaf or bark mix, or reusable rocks like dry stall, chick grit, or gritty mix.
How to Sterilize Soil for Potting
If you have a pile of dirt just sitting outside (or want to save some money), you may be wondering if you really do need potting soil. Again, soil can harbor all sorts of things you don’t want in your indoor garden, including pests (like fungus gnats), blight, diseases, and of course, weeds. If you don’t want to buy your soil, you can sterilize your own at home. Be it made at home or store bought, soil is pretty crucial to grow an indoor garden.
To sterilize it in the oven, put about 4 inches deep of dirt into an oven-safe container (glass or metal) and cover it with foil. Place a meat or candy thermometer in the center and bake the dirt at 180 to 200F° for around 30 minutes until the soil reaches 180F°. (If it gets hotter, it can produce toxins.) Remove the dirt from the oven and let it cool. Leave the foil covering until you’re ready to use the soil.
You can also use a microwave instead of the oven. Fill a microwave-safe container (preferably with a lid that has ventilation holes) with damp soil. Heat the soil at full heat for about 90 seconds for every couple of pounds. Allow to cool and then keep covered until ready to use.
Even if you have soil around that you can sterilize, you may still want to consider buying a potting mix as these are designed to provide the nutrients and minerals your plants need to thrive. In addition, because they’re a combination of soil, compost, and perlite, they retain more water and tend to be easier to work with.
What Can You Grow in an Indoor Garden?
If you are new to indoor growing, you’ll want to be easy on yourself. Start with less, and as you build up experience, you can expand your indoor garden. Some good “starter” plants include radishes, spinach, arugula, and leaf lettuce (especially loose-leaf salad greens). If you’re feeling more adventurous (or experienced), you can also add some container tomatoes, carrots, peas, and beans.
Other good options for an indoor garden include:
- Scallions/green onions
- Microgreens of baby kale, beets, and arugula
- Herbs like basil, rosemary, cilantro, chives, thyme, oregano, cilantro, mint, and parsley
- Potatoes
- Strawberries
- Kale
- Ginger
- Flowers of your choice
It’s a good idea to start with plants you often eat and find yourself buying. For example, if you add spinach or kale to your high-protein smoothie every morning, then that’s a good one for you to grow. If you love a big salad for lunch, then grow a variety of loose-leaf lettuce that you can pick throughout the week. (If you are growing lettuce, you’ll want to start new seeds every couple of weeks, as lettuce can get bitter after it’s been harvested several times.)
Because seeds are less expensive than plants, even if you want to move your garden outside once the weather is warmer, now’s a good time to start your seeds indoors.
Time to Start Planting Your Indoor Garden
Now that you have all your supplies and seeds, it’s time to plant. Start by filling your containers with about ¾ of damp potting soil. (Make sure the containers have drainage holes and/or rocks at the bottom to prevent the plants from getting waterlogged). Using your fingers, gently level out the surface of the soil. Don’t press too hard, though, as you want to keep your soil light and fluffy for good drainage and airflow.
Now it’s time to add your seeds. Place them about one to two inches apart. (Since you’ll only need a couple of seeds for each container, save the remainder of the seed packet in a cool, dry place for future grows.) Avoid over seeding. Then cover the seeds lightly with soil and spray with a light mist of water. You can also place the containers in a pan of warm (not hot!) water, so they can absorb water from the bottom.
Don’t forget to mark your plants if you’re growing a variety, so you can know how often to feed or water, as well as to gauge its growth and troubleshoot any issues.
Finally, cover up the soil with mulch, so your plants will look their best, retain water, enjoy a more even temperature, and stay strong and healthy as they grow.
Care and Feeding Your Indoor Garden
Unlike an outdoor garden, you won’t have Mother Nature to assist you with the watering and feeding of your plants. So, they will take a bit more care and attention than an outdoor garden. In addition, soil tends to dry up more quickly than it does outside, so plan on watering at least daily and perhaps twice a day (morning and evening). But you don’t want to overwater, as your plants can quickly become waterlogged, which is why good drainage holes are so important.
To help keep the plants from getting dry on a hot day, you can also set up a cool-mist humidifier near the garden. Either way, check your soil moisture daily. It should have a texture that’s similar to a sponge that’s had the water squeezed out.
On top of this, the regular watering and lack of natural compost means you’ll also need to fertilize (or feed) your veggies regularly to grow an indoor garden. Plan on weekly or at least twice a month, depending on which fertilizer you choose.
To ensure your seeds stay nice and cozy before they germinate, you can cover them with damp newspaper or plastic (such as the lid to your plastic cup, plastic wrap, or recycled film) to keep in the warmth and moisture. However, once the plants break through, you’ll want to remove any covering.
To Grow Light or Not to Grow Light
If you have a modest garden, modest expectations, and a good window, you can grow a variety of vegetables with just sunlight. However, if you want to expand your growing capabilities, you may want to supplement the natural sunlight with a grow light. Full-spectrum LEDs are recommended for their energy-efficiency.
Just place the lights about six inches above your plants; you will need to either raise the lights or lower the plants as they grow, so they remain around six inches away from the light.
Harvesting Your Indoor Garden
Once your leaves are large enough to clip (if you’re growing lettuce, spinach, or herbs) or you have some ripe produce, it’s time to harvest! Harvest time, of course, is different between plants. You’ll be harvesting lettuce and spinach, for example, long before a single tomato is ready. Since you’ll be watering and feeding them on the regular, just keep a good eye on them to know when they’re ready.
Once you start tasting your fresh-from-the-garden vegetables, chances are you’ll be hooked on indoor gardening. But even before it’s ready to be harvested, you’ll enjoy the benefits of getting up close and personal with nature to enjoy the physical and mental benefits of gardening.


 7 Signs Your Body is Seriously Low on Collagen (not just wrinkles)
 Health Expert: "Turmeric Doesn't Work (unless...)"
 3 Warning Signs Your Probiotic Supplement is a Total Waste

